

Xem hướng dẫn cài đặt grafana, prometheus server: Phần 3: Hướng Dẫn Cài Grafana – Prometheus giám sát hệ thống trên portainer
Trong bài viết trước, chúng ta đã cài đặt và cấu hình xong Grafana cùng Prometheus server. Tuy nhiên, để có thể giám sát các server trong hệ thống, chúng ta cần một agent thu thập metrics từ các máy client. Đó chính là lúc Node Exporter phát huy vai trò quan trọng.
Hiểu Về Mối Quan Hệ: Grafana – Prometheus – Node Exporter
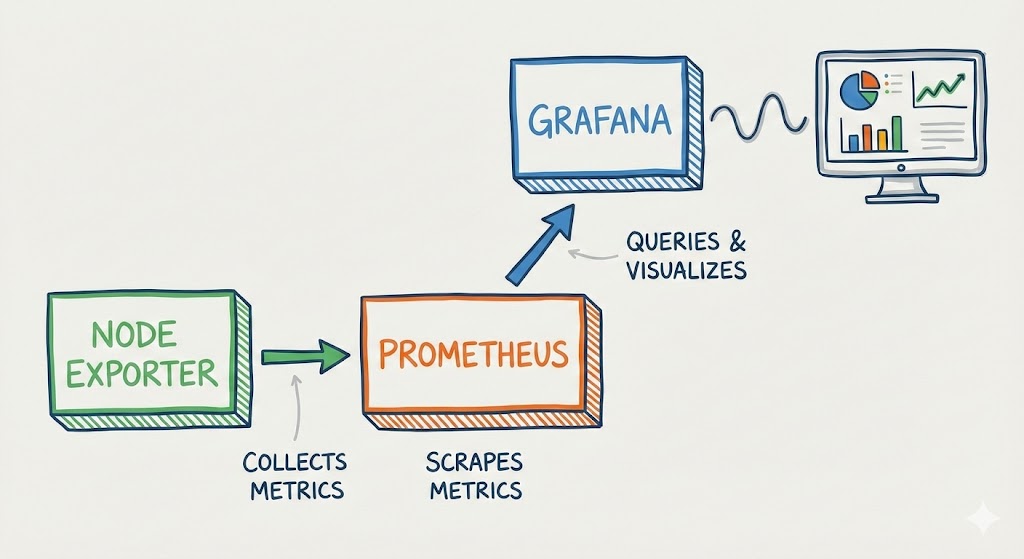
Trước khi đi vào chi tiết cài đặt, cần hiểu rõ cách ba thành phần này hoạt động cùng nhau:
Node Exporter (Agent thu thập) là một exporter chính thức từ Prometheus, chạy trên mỗi server cần giám sát. Nó thu thập các metrics về phần cứng và hệ điều hành như CPU usage, RAM, disk I/O, network traffic, filesystem usage và expose các metrics này qua HTTP endpoint (mặc định port 9100).
Prometheus (Database & Scraper) hoạt động theo mô hình pull-based. Nó định kỳ gửi HTTP request đến các Node Exporter endpoints (quá trình này gọi là “scrape”), thu thập metrics và lưu trữ vào time-series database của mình. Prometheus có khả năng query, aggregate và alert dựa trên dữ liệu thu thập được.
Grafana (Visualization Layer) kết nối với Prometheus như một data source, query dữ liệu metrics và hiển thị chúng dưới dạng dashboard trực quan với charts, graphs và tables. Grafana không lưu trữ metrics mà chỉ visualize dữ liệu từ Prometheus.
Luồng dữ liệu hoạt động như sau: Node Exporter thu thập metrics từ OS → Prometheus scrape metrics từ Node Exporter → Grafana query metrics từ Prometheus → Dashboard hiển thị cho người dùng. Hiểu rõ luồng này sẽ giúp troubleshoot dễ dàng hơn khi gặp vấn đề.
Cài Đặt Node Exporter Trên Linux
Node Exporter được thiết kế chủ yếu cho các hệ thống Unix-like (Linux, BSD). Cài đặt trên Linux khá đơn giản và có nhiều phương pháp.
Phương Pháp 1: Cài Đặt Từ Binary
Đây là cách phổ biến và linh hoạt nhất, hoạt động trên mọi distro Linux.
Bước 1: Download Node Exporter
Truy cập GitHub releases của Prometheus để lấy phiên bản mới nhất. Tại thời điểm viết bài, phiên bản stable là 1.8.0:
cd /tmp
wget https://github.com/prometheus/node_exporter/releases/download/v1.8.0/node_exporter-1.8.0.linux-amd64.tar.gz
tar xvfz node_exporter-1.8.0.linux-amd64.tar.gz
sudo mv node_exporter-1.8.0.linux-amd64/node_exporter /usr/local/bin/
rm -rf node_exporter-1.8.0.linux-amd64*
Bước 2: Tạo User và Service
Tạo user riêng cho Node Exporter (best practice về security):
sudo useradd --no-create-home --shell /bin/false node_exporterTạo systemd service file để quản lý Node Exporter:
sudo nano /etc/systemd/system/node_exporter.serviceThêm nội dung sau:
[Unit]
Description=Node Exporter
After=network.target

[Service]
User=node_exporter
Group=node_exporter
Type=simple
ExecStart=/usr/local/bin/node_exporter

[Install]
WantedBy=multi-user.target
Bước 3: Khởi Động Service
sudo systemctl daemon-reload
sudo systemctl start node_exporter
sudo systemctl enable node_exporter
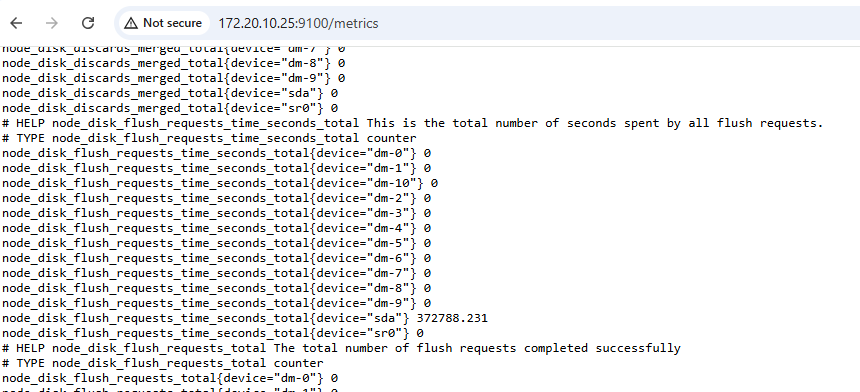
sudo systemctl status node_exporterKiểm tra xem Node Exporter đã chạy chưa bằng cách truy cập endpoint:
curl http://localhost:9100/metricsNếu thấy một loạt metrics được in ra, Node Exporter đã hoạt động thành công.
Phương Pháp 2: Cài Qua Package Manager
Một số distro có Node Exporter trong repository chính thức:
Ubuntu/Debian:
sudo apt update
sudo apt install prometheus-node-exporter
sudo systemctl status prometheus-node-exporter
CentOS/RHEL/Rocky Linux:
sudo yum install epel-release
sudo yum install node_exporter
sudo systemctl start node_exporter
sudo systemctl enable node_exporter
Lưu ý rằng phiên bản trong repository có thể cũ hơn phiên bản mới nhất trên GitHub.
Cài Đặt Node Exporter Trên Windows
Node Exporter nguyên bản không hỗ trợ Windows. Thay vào đó, community đã phát triển Windows Exporter (trước đây gọi là WMI Exporter), một exporter tương đương cho Windows.
Download và Cài Đặt Windows Exporter
Bước 1: Download Installer
Truy cập GitHub repository của Windows Exporter: https://github.com/prometheus-community/windows_exporter/releases
Download file MSI installer mới nhất (ví dụ: windows_exporter-0.25.1-amd64.msi).
Bước 2: Cài Đặt
Double-click file MSI để chạy installer. Trong quá trình cài đặt, bạn có thể customize các collectors được enable. Mặc định, các collectors cơ bản như CPU, Memory, Disk, Network đã được bật.
Nếu muốn custom collectors, có thể dùng command line để install (tuỳ chọn):
msiexec /i windows_exporter-0.25.1-amd64.msi ENABLED_COLLECTORS="cpu,cs,logical_disk,net,os,system,memory"Bước 3: Kiểm Tra Service
Sau khi cài đặt, Windows Exporter sẽ tự động chạy như một Windows Service. Kiểm tra bằng Services Manager (services.msc) hoặc PowerShell:
Get-Service windows_exporter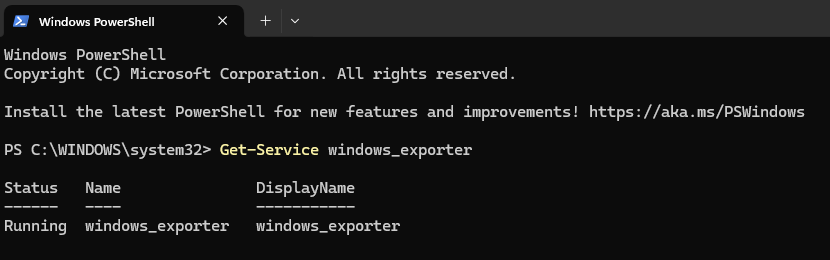
Test endpoint bằng trình duyệt hoặc PowerShell:
Invoke-WebRequest -Uri http://localhost:9182/metrics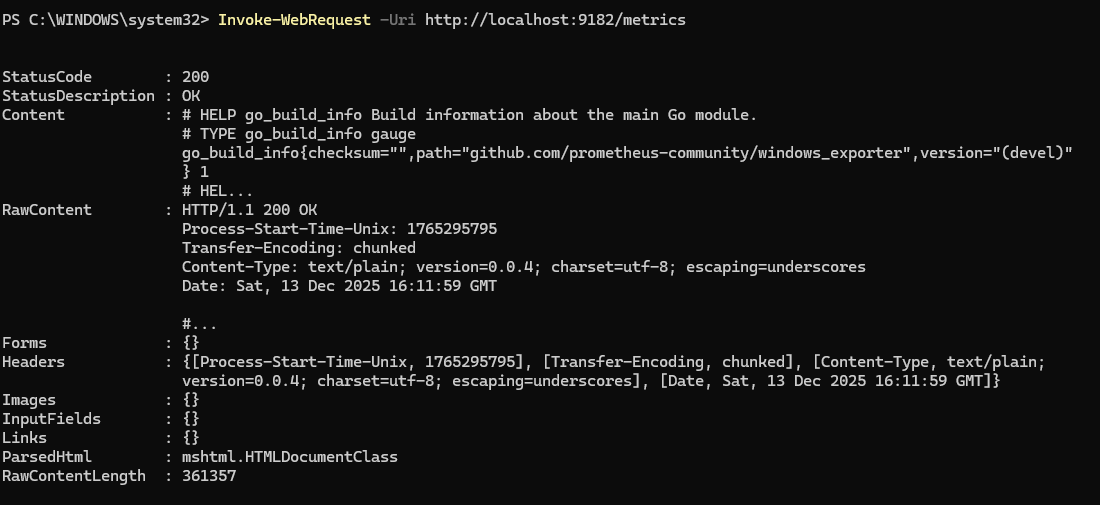
Lưu ý Windows Exporter sử dụng port 9182 thay vì 9100 như Node Exporter trên Linux.
Cấu Hình Firewall
Nếu Prometheus server ở máy khác, cần mở port trong Windows Firewall:
New-NetFirewallRule -DisplayName "Windows Exporter" -Direction Inbound -Protocol TCP -LocalPort 9182 -Action AllowThêm Targets Vào Prometheus Server
Sau khi các Node Exporter đã chạy trên các client, bước tiếp theo là cấu hình Prometheus server để scrape metrics từ chúng.
Chỉnh Sửa Prometheus Configuration
SSH vào Prometheus server và edit file config (thường là /etc/prometheus/prometheus.yml), file này đã được ánh xạ trong docker compose, bạn có thể xem lại ở bài viết:
sudo nano /etc/prometheus/prometheus.ymlThêm job mới cho Node Exporter vào cuối file, trong section scrape_configs:
scrape_configs:
  - job_name: 'prometheus'
    static_configs:
      - targets: ['localhost:9090']

  - job_name: 'node_exporter_linux'
    static_configs:
      - targets:
          - '192.168.1.101:9100'  # Linux Server 1
          - '192.168.1.102:9100'  # Linux Server 2
          - '192.168.1.103:9100'  # Linux Server 3
        labels:
          env: 'production'
          os: 'linux'

  - job_name: 'windows_exporter'
    static_configs:
      - targets:
          - '192.168.1.201:9182'  # Windows Server 1
          - '192.168.1.202:9182'  # Windows Server 2
        labels:
          env: 'production'
          os: 'windows'
Giải thích cấu hình:
job_name: Tên job để phân biệt các nhóm targets. Nên đặt tên có ý nghĩa.
targets: Danh sách các endpoint của Node Exporter, format là IP:PORT. Có thể dùng hostname nếu DNS đã được cấu hình.
labels: Custom labels để filter và group metrics. Rất hữu ích khi có nhiều server và môi trường khác nhau.
Reload Configuration
docker restart prometheus
Kiểm Tra Targets Trong Prometheus UI
Mở trình duyệt, truy cập Prometheus UI tại http://<PROMETHEUS_IP>:9090. Vào menu Status > Targets.
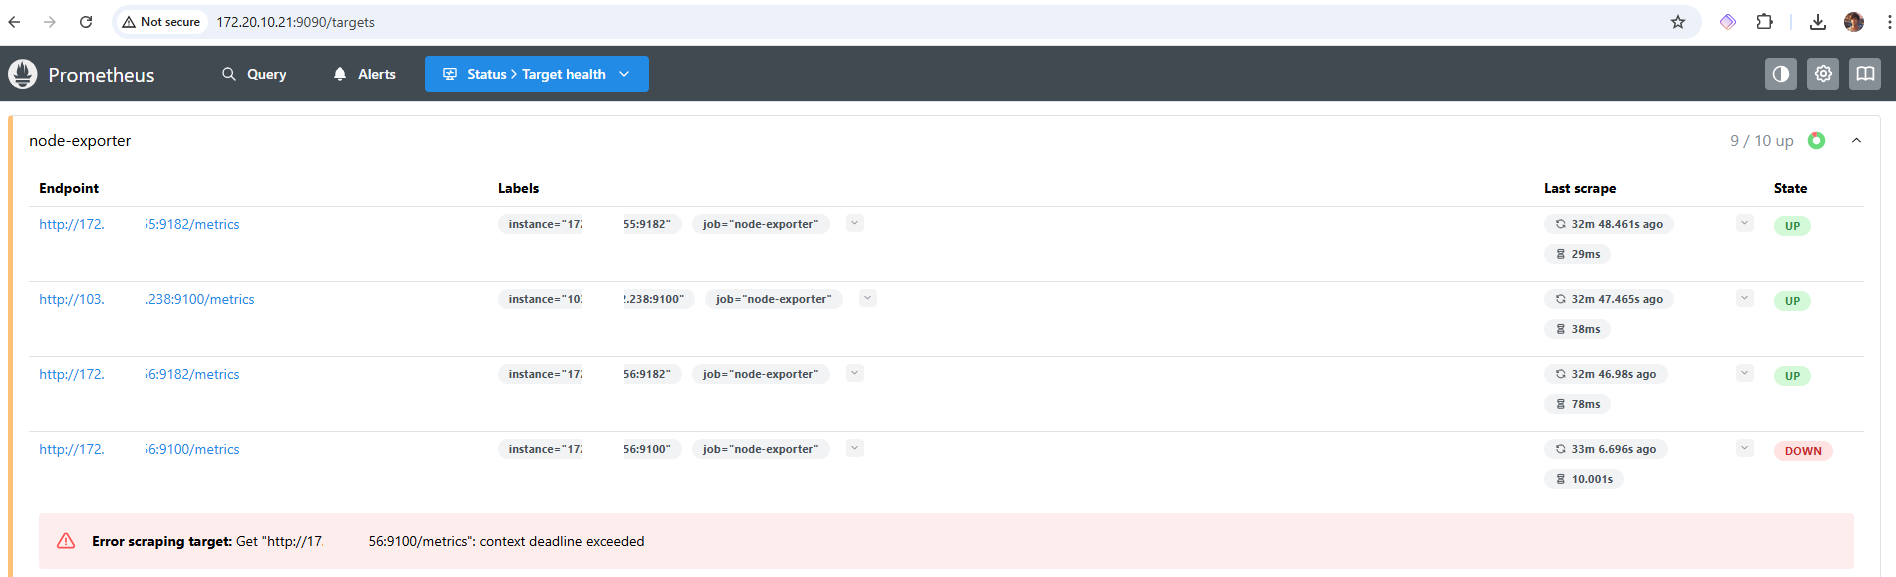
Bạn sẽ thấy danh sách tất cả các targets với trạng thái. Nếu state là UP (màu xanh), nghĩa là Prometheus đang scrape thành công. Nếu state là DOWN (màu đỏ), cần troubleshoot:
Network connectivity: Kiểm tra xem Prometheus server có thể ping đến IP của target không.
Firewall: Đảm bảo port 9100 (Linux) hoặc 9182 (Windows) đã được mở trên target.
Exporter status: Kiểm tra xem Node Exporter/Windows Exporter có đang chạy trên target không.
Wrong port: Đảm bảo đang dùng đúng port (9100 cho Linux, 9182 cho Windows).
Tạo Dashboard Trên Grafana
Khi Prometheus đã thu thập được metrics từ các Node Exporter, đã đến lúc tạo dashboard trực quan trên Grafana.
Kết Nối Prometheus Data Source
Nếu chưa kết nối Prometheus với Grafana ở bài trước, làm theo các bước sau:
Đăng nhập vào Grafana (http://<GRAFANA_IP>:3000), vào menu Connections > Data sources > Add data source. Chọn Prometheus.
Trong phần configuration:
- URL:
http://<PROMETHEUS_IP>:9090(hoặchttp://localhost:9090nếu cùng máy) - Access: Chọn Server (Grafana server sẽ truy cập Prometheus)
Click Save & test. Nếu thấy thông báo “Data source is working”, kết nối thành công.
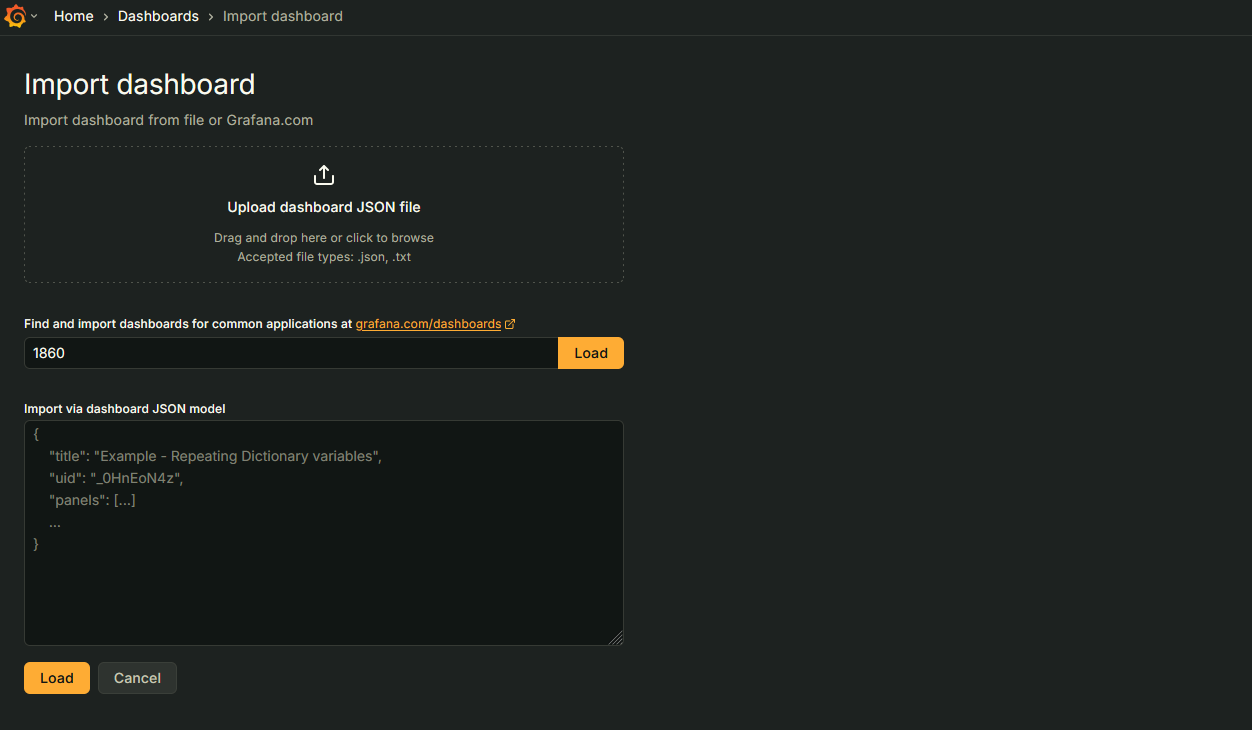
Import Dashboard Template
Cách nhanh nhất để có dashboard đẹp và đầy đủ tính năng là import template có sẵn từ Grafana community.
Bước 1: Tìm Dashboard Template
Truy cập https://grafana.com/grafana/dashboards/ và search “node exporter”. Một số dashboard phổ biến:
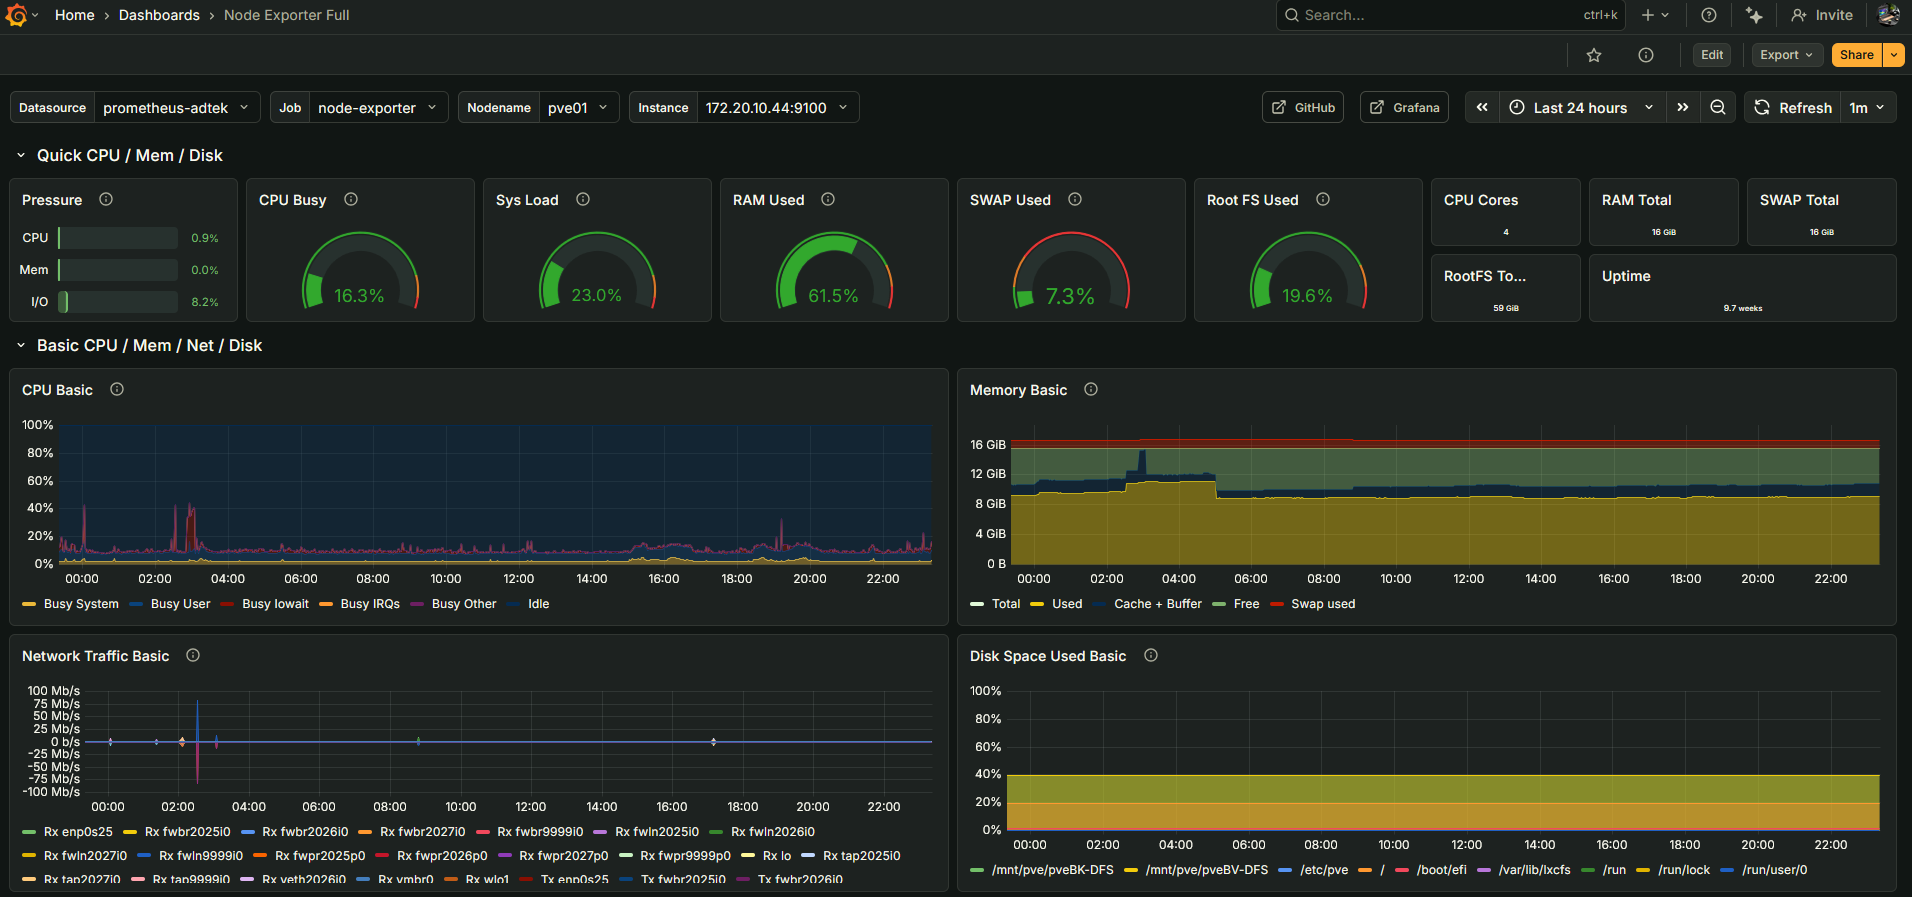
- Node Exporter Full (ID: 1860): Dashboard toàn diện nhất, hiển thị tất cả metrics của Node Exporter
- Node Exporter for Prometheus (ID: 11074): Dashboard đẹp, tối ưu cho nhiều server
- Windows Exporter Dashboard (ID: 14694): Dành riêng cho Windows server
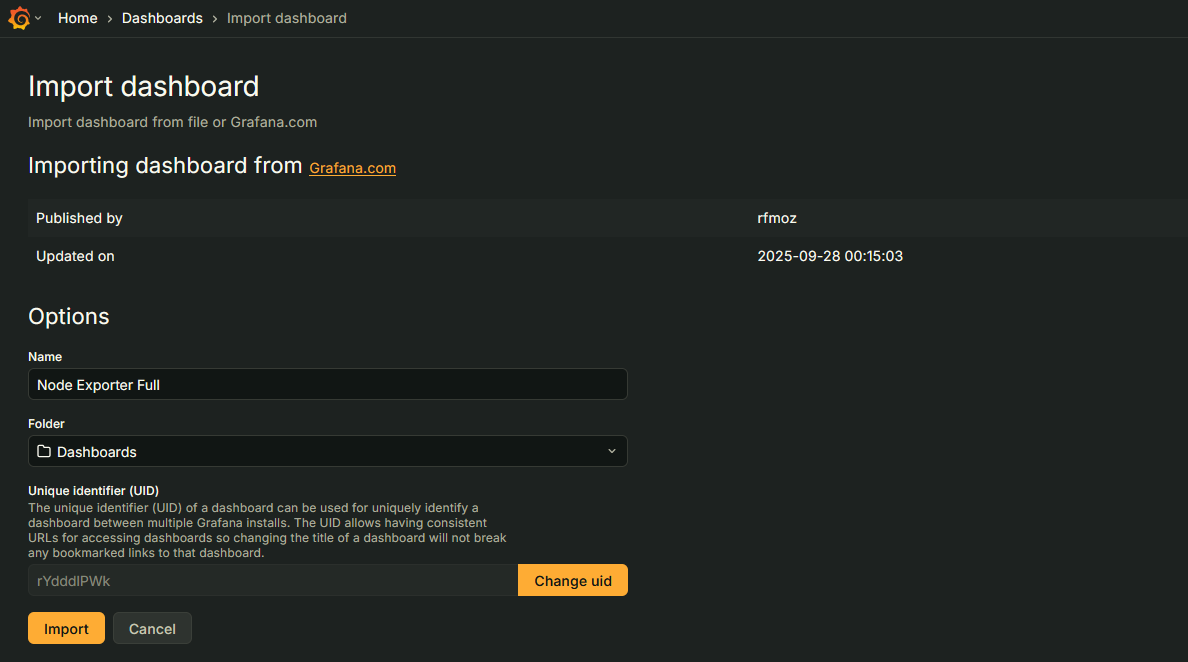
Bước 2: Import Dashboard
Trong Grafana, vào menu Dashboards > New > Import. Nhập dashboard ID (ví dụ: 1860) vào ô Import via grafana.com và click Load.

Chọn Prometheus data source đã cấu hình ở bước trước, sau đó click Import. Dashboard sẽ được tạo và hiển thị metrics từ các Node Exporter.
Thành quả:
Tạo Dashboard Từ Đầu (tùy chọn):
Thường thì để nhanh, chúng ta import dashboard như cách 1, sau đó dùng cách này để “chế biến” thêm. Nếu muốn tự tạo dashboard với các panels tùy chỉnh:
Bước 1: Tạo Dashboard Mới
Vào Dashboards > New > New Dashboard. Click Add visualization, chọn Prometheus data source.
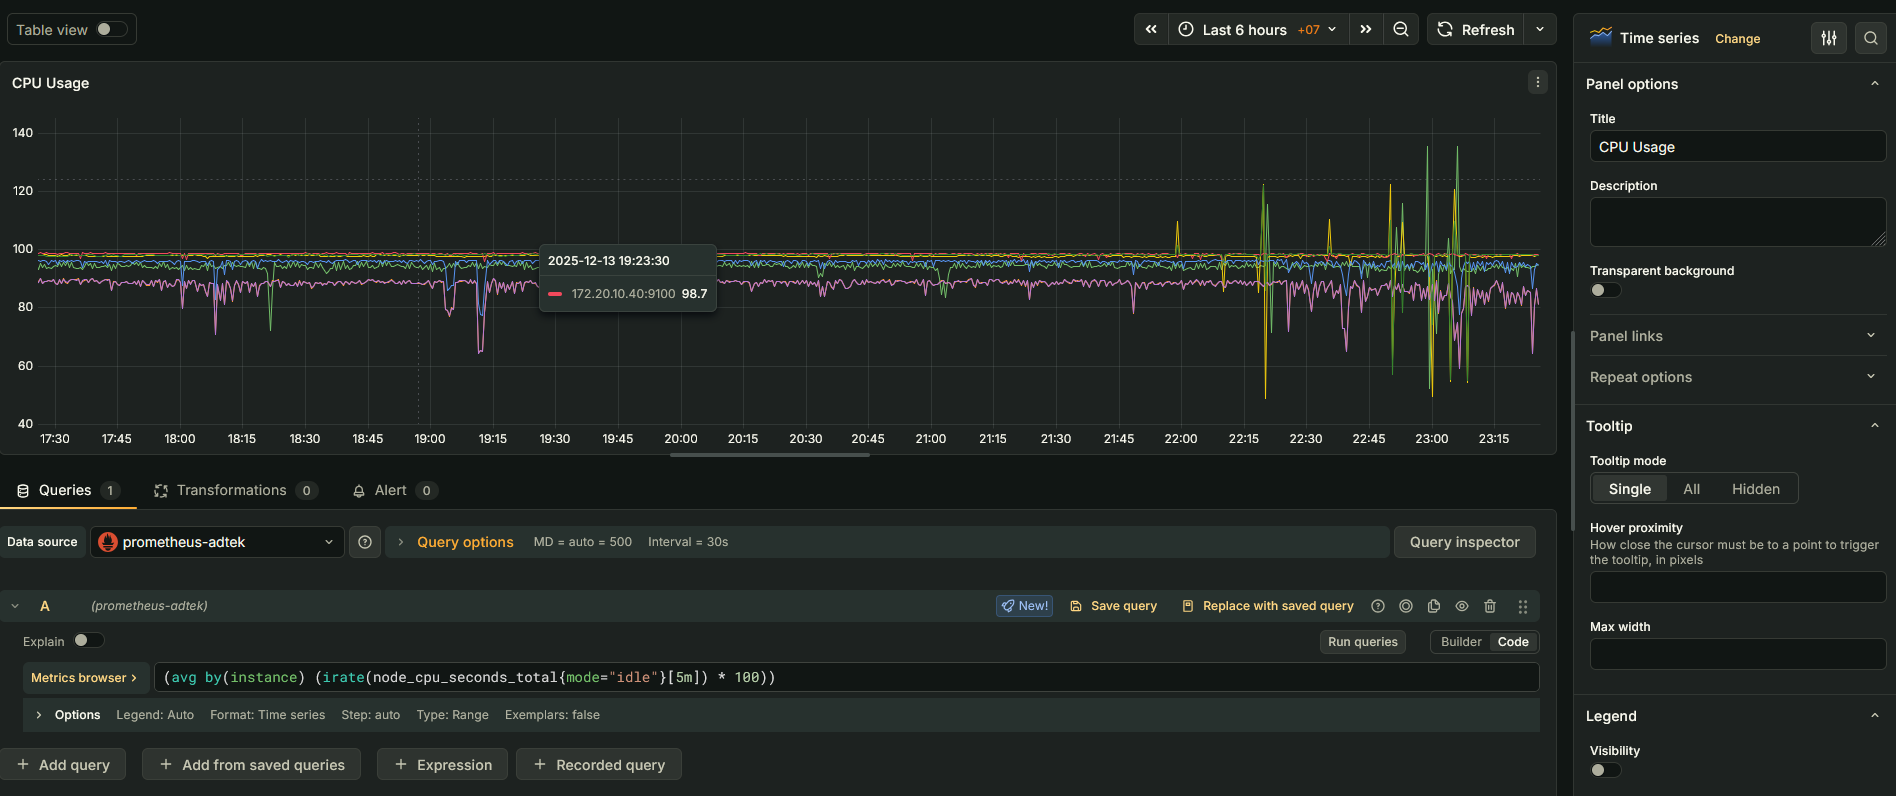
Bước 2: Thêm Panel CPU Usage
Trong query editor, chọn Code mode và nhập PromQL query:
100 - (avg by (instance) (irate(node_cpu_seconds_total{mode="idle"}[5m])) * 100)Query này tính phần trăm CPU đang được sử dụng (100% trừ đi idle time). Trong phần Options, đặt:
- Title: CPU Usage (%)
- Unit: Percent (0-100)
- Visualization: Time series hoặc Gauge
Click Apply để lưu panel.
Bước 3: Thêm Panel Memory Usage
Add visualization mới với query:
(1 - (node_memory_MemAvailable_bytes / node_memory_MemTotal_bytes)) * 100Đặt title là “Memory Usage (%)”, unit là Percent (0-100).
Bước 4: Thêm Panel Disk Usage
Query để hiển thị disk usage:
100 - ((node_filesystem_avail_bytes{mountpoint="/",fstype!="rootfs"} / node_filesystem_size_bytes{mountpoint="/",fstype!="rootfs"}) * 100)Bước 5: Thêm Panel Network Traffic
Để hiển thị network bandwidth:
irate(node_network_receive_bytes_total{device!="lo"}[5m]) * 8Query này tính receive rate tính bằng bits per second. Tương tự cho transmit:
irate(node_network_transmit_bytes_total{device!="lo"}[5m]) * 8Đặt unit là “bits/sec” hoặc “bytes/sec”.
Customize và Organize Dashboard
Sau khi đã có các panels cơ bản:
Arrange layout: Drag & drop các panels để sắp xếp theo ý muốn. Resize panels bằng cách kéo góc.
Add variables: Vào Dashboard settings > Variables để tạo dropdown filters. Ví dụ, tạo variable $instance để chọn server cụ thể:
label_values(node_uname_info, instance)Sau đó dùng variable này trong queries: {instance="$instance"}
Add rows: Group các panels liên quan vào rows để dễ quản lý và collapse/expand.
Set time range: Adjust time picker ở góc trên bên phải để xem metrics trong khoảng thời gian khác nhau (Last 1 hour, Last 24 hours, v.v.).
Enable auto-refresh: Set refresh interval (5s, 30s, 1m) để dashboard tự động cập nhật.
Monitoring Best Practices
Đặt tên có ý nghĩa: Sử dụng labels và job names rõ ràng để dễ phân biệt các servers và environments.
Set up alerting: Tạo alert rules trong Prometheus hoặc Grafana để nhận thông báo khi metrics vượt ngưỡng (CPU > 80%, disk > 90%, v.v.).
Retention policy: Cấu hình storage retention trong Prometheus để cân bằng giữa lượng data lưu trữ và disk space.
Organize dashboards: Tạo các dashboards khác nhau cho từng mục đích: Overview, Detailed per server, Application-specific, v.v.
Document queries: Thêm descriptions vào panels để giải thích ý nghĩa của metrics và queries.
Regular review: Định kỳ xem lại và update dashboards, loại bỏ panels không còn cần thiết, thêm metrics mới khi cần.
Troubleshooting Common Issues
No data in dashboard: Kiểm tra Prometheus targets status, đảm bảo targets đang UP. Verify data source connection trong Grafana. Check query syntax trong panel.
Metrics missing: Một số metrics chỉ có trên collectors được enable. Kiểm tra Node Exporter đang chạy với collectors nào.
High CPU usage: Quá nhiều targets hoặc scrape interval quá ngắn có thể làm Prometheus tiêu tốn nhiều CPU. Tăng scrape interval hoặc optimize queries.
Dashboard slow: Queries phức tạp hoặc time range quá dài có thể làm chậm dashboard. Optimize queries, giảm time range, hoặc tăng cấu hình server.
Kết Luận
Việc xây dựng hệ thống monitoring với Grafana, Prometheus và Node Exporter giúp bạn có cái nhìn toàn diện về infrastructure. Từ CPU, memory, disk đến network traffic, tất cả đều được visualize real-time trên dashboard trực quan.
Quy trình đơn giản: cài Node Exporter trên các client machines, cấu hình Prometheus để scrape metrics từ các exporters, và cuối cùng tạo dashboard trên Grafana để hiển thị dữ liệu. Với hệ thống này, bạn có thể phát hiện vấn đề sớm, analyze performance patterns và đưa ra quyết định tối ưu dựa trên data thực tế.
Monitoring không chỉ là công cụ troubleshooting mà còn là nền tảng cho capacity planning, performance optimization và đảm bảo reliability của toàn bộ hệ thống.